
Thinking about brightening up your bathroom with some new lights? Polished chrome contemporary fixtures are a pretty solid choice, and here’s why. They’re sleek, they bounce light around like nobody’s business, and they generally play nice with a lot of different bathroom styles. So, yeah, they’re a practical way to give your space a modern facelift without a full renovation.
So, what’s the big deal with polished chrome in the bathroom? It’s not just about looking fancy. There are some real practical benefits that make it a smart pick for this particular room.
It’s All About the Shine
Polished chrome has that bright, reflective surface. This isn’t just for looks; it actually helps to make your bathroom feel bigger and more open, especially if it’s a smaller space. Think about how mirrors can do that – chrome offers a similar effect, but in a more integrated way with your lighting Zifoto.
Maximizing Light Reflection
The smoothness of polished chrome means light bounces off it easily. This can be awesome for making sure every corner of your bathroom gets enough illumination, reducing dark spots, and creating a generally brighter atmosphere. This is super helpful for tasks like shaving or applying makeup.
A Clean, Modern Aesthetic
Beyond the light-play, polished chrome just looks modern. It’s got that clean, almost minimalist vibe that works so well with contemporary bathroom designs. It’s not fussy, it’s not ornate – it’s straightforward and stylish.
Durability and Water Resistance
Bathrooms are, well, wet. Polished chrome holds up pretty well in damp environments. While no metal is completely impervious to corrosion over decades, polished chrome is generally resistant to rust and tarnishing, which is a big win in a bathroom setting.
Resisting Moisture and Humidity
The plating on polished chrome is designed to withstand the higher humidity levels found in bathrooms. This means you’re less likely to see pitting or discoloration compared to some other finishes.
Easy to Keep Looking Good
Another practical plus: polished chrome is relatively easy to clean. A quick wipe with a soft cloth can usually take care of fingerprints and water spots. It’s not a complete set-it-and-forget-it material, but it’s certainly manageable. We’ll touch more on maintenance later, but the baseline is that it’s not a high-maintenance finish.
Versatility in Design
You might think “contemporary chrome” means one specific look, but there’s actually quite a bit of variety. You can find fixtures that lean more minimalist, or those with slightly more decorative elements while still being firmly in the contemporary camp.
Pairing with Different Color Palettes
Polished chrome is incredibly versatile when it comes to color. It looks fantastic with crisp whites, sleek grays, deep blues, and even warmer tones if you’re going for a modern-transitional look. It doesn’t clash easily, making it a safe bet if you’re not sure about your color scheme.
Complementing Various Vanity Styles
Whether you have a floating vanity, a more traditional wood cabinet, or something in between, polished chrome fixtures can often adapt. Their clean lines tend to bridge different styles effectively, bringing a modern edge to even slightly more traditional pieces.
Popular Types of Polished Chrome Contemporary Light Fixtures
When you head out to shop, you’ll encounter a few main types of lighting that are commonly found in polished chrome and fit that contemporary style. Knowing what these are will help you narrow down your search and figure out what will best serve your bathroom’s needs.
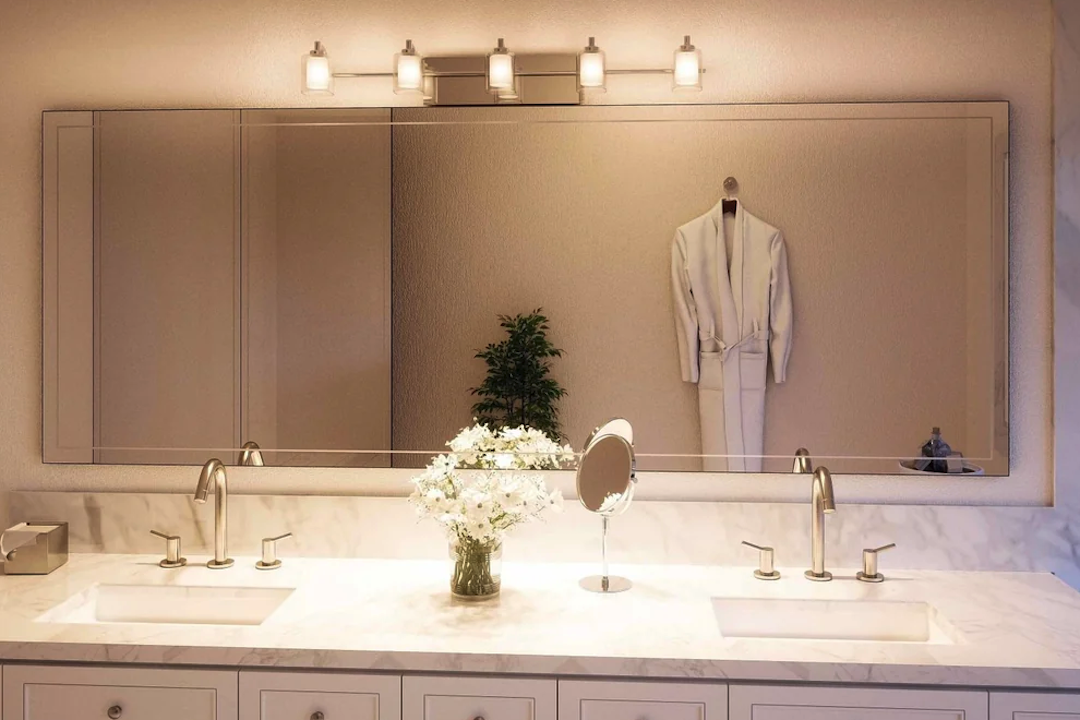
Vanity Lights: The Workhorses
These are probably the most critical lights in your bathroom, as they’re directly above or beside your mirror, where you do most of your grooming. Getting them right makes a huge difference.
Sconce-Style Fixtures
These are often mounted on either side of the mirror. They provide balanced illumination, which is excellent for avoiding shadows on your face. Look for ones with clean, vertical lines or simple geometric shapes.
Side-by-Side Illumination
The ideal setup here is two sconces, one on each side of the mirror, positioned at about eye level. This ensures even light distribution without the harsh glare you can get from a single overhead fixture.
Modern Designs to Look For
Think linear designs, simple cylinders, or even frosted glass shades that diffuse light softly. Avoid anything with ornate detailing; keep it streamlined.
Bar-Style Fixtures
These are typically placed above the mirror, running horizontally. They can be a great option, especially if you have a wider vanity or a single, large mirror.
Overhead Illuminating Bars
These fixtures often feature multiple bulbs or a continuous LED strip. They provide good general lighting for the vanity area.
Consider Integrated LED Technology
Many modern bar lights come with integrated LED strips. These are energy-efficient, long-lasting, and often offer dimmable capabilities, giving you control over the light intensity.
Ceiling Lights: The Ambient Foundation
These provide the overall light for the room, creating the general atmosphere. Even if you have great vanity lights, you still need good overhead illumination.
Flush Mount Fixtures
These sit directly against the ceiling and are a popular choice for their space-saving design, especially in bathrooms with lower ceilings.
Sleek and Unobtrusive
Look for flush mounts with simple, clean lines. Frosted glass or acrylic shades are common for diffusion.
Simple Geometric Shapes
Think circles, squares, or subtle rectangles. These shapes blend seamlessly into modern ceiling designs.
Semi-Flush Mount Fixtures
These hang down a bit from the ceiling, creating a small gap. This allows light to also reflect upwards, providing a softer, more ambient glow.
Adding a Little Dimension
They offer a bit more visual interest than a standard flush mount without taking up too much vertical space.
Diffused Light for Softness
The slight downward projection can help direct light where you need it while still providing that up-light for a gentler overall illumination.
Accent and Task Lighting: The Finishing Touches
While not strictly necessary for everyone, these can elevate your bathroom experience and add a touch of sophistication.
Recessed Lighting
These are fitted into the ceiling, creating a clean, integrated look. They’re great for general illumination or for highlighting specific areas.
Discreet and Modern
When done well, recessed lights are almost invisible, letting the other elements of your bathroom shine.
Strategic Placement is Key
They can be used to brighten the entire room, or strategically placed over the shower area or for accenting artwork.
Integrated LED Strips
These are becoming increasingly popular and can be incorporated into vanities, medicine cabinets, or even shower niches.
Under-Cabinet Glow
Adding LED strips underneath your vanity can create a stylish “floating” effect and provide a soft, ambient light for nighttime.
Shower Niches and Shelving
Illuminating recessed shelves or niches in the shower adds a spa-like feel and makes it easier to find your toiletries.
Choosing the Right Light Bulbs for Your Fixtures
The fixture itself is only half the story. What kind of bulb you put in it makes a massive difference to how the light looks and feels in your bathroom. For polished chrome contemporary fixtures, you’ll want to consider a few things.
LED Technology: The Modern Standard
Unless you’re intentionally going for a vintage vibe (which often doesn’t pair well with contemporary chrome), LED bulbs are the way to go. They’re energy-efficient, last a long time, and offer a lot of flexibility.
Energy Efficiency and Longevity
LEDs use significantly less electricity than incandescent bulbs and last for tens of thousands of hours. This means lower energy bills and fewer trips to the store to buy replacement bulbs.
Dimmability for Mood Control
Many LED bulbs are now dimmable. This is a game-changer for bathrooms. You can have bright light for getting ready and then dim it down for a more relaxing soak in the tub. Ensure your fixture is also compatible with dimmable bulbs and that you have a dimmer switch installed.
Color Temperature: Warm vs. Cool Light
This is probably the most important factor in how your bathroom feels. Color temperature is measured in Kelvin (K).
Warm White (2700K – 3000K)
This is similar to the light from traditional incandescent bulbs. It’s a soft, yellowish light that creates a cozy, inviting atmosphere. It’s great for creating a spa-like feel and is generally flattering for most skin tones.
Creating a Relaxing Ambiance
If your bathroom is a place for unwinding, warm white is ideal. It promotes relaxation and can make the space feel more comfortable and less clinical.
Flattering for Skin Tones
Many people find warm white light to be the most flattering for applying makeup or grooming, as it doesn’t cast harsh or unnatural tones.
Cool White / Daylight (4000K – 5000K)
This light is brighter and has a bluer, more neutral tone. It mimics natural daylight and is excellent for task lighting where clarity and detail are important.
Enhanced Clarity for Tasks
If your vanity area is where you do detailed work like makeup application, shaving, or intricate hairstyling, a cooler temperature can provide better visibility and accuracy.
Bright and Alerting
Cool white light can also make a bathroom feel cleaner and more awake. It’s a good choice if you use your bathroom early in the morning.
Neutral White (3500K – 4000K)
This sits in the middle – it’s not too warm and not too cool. It offers a good balance between a comfortable atmosphere and sufficient brightness for tasks.
A Versatile Middle Ground
If you’re struggling to decide, neutral white is often a safe bet. It provides good illumination without feeling too sterile or too dim.
Brightness (Lumens) Matters Too
Beyond color temperature, consider the brightness, measured in lumens. A small bathroom might not need the same lumen output as a large master en-suite.
Match Lumens to Room Size and Function
General guidelines suggest:
- Vanity area: aim for around 80-100 lumens per square foot.
- General room illumination: 20-50 lumens per square foot.
Don’t Underestimate the Need for Brightness at the Vanity
For grooming tasks, you want sufficient brightness. Over-lighting can be mitigated with dimmers, but under-lighting is harder to fix.
Installation Considerations and Best Practices
Putting up new light fixtures, even if you’re handy, requires a bit of know-how to ensure safety and good results. Especially in a bathroom where water is involved, careful installation is key.
Safety First: Power Off!
This might sound obvious, but it bears repeating. Always turn off the power to the circuit you’re working on at the breaker box before touching any wires. Double-check with a voltage tester to be absolutely sure.
Locate Your Breaker Box
Familiarize yourself with where your home’s electrical panel is and how to identify the correct breaker for your bathroom.
Use a Non-Contact Voltage Tester
This is an essential tool for confirming that the power is off at the fixture location before you start any work. Don’t rely on just flipping the switch.
Wiring and Connections
Bathroom light fixtures are typically connected using wire nuts. Ensure all connections are secure and properly insulated.
Matching Wire Colors and Gauges
Typically, black is hot, white is neutral, and green or bare copper is ground. Ensure you’re connecting like-colored wires together through the wire nut. Use wire nuts that are the appropriate size for the number and gauge of wires you’re joining.
Grounding is Crucial
The ground wire (green or bare copper) is a vital safety feature. It provides a path for electricity to flow safely to the ground in case of a fault, preventing electric shock. Make sure it’s securely connected.
Mounting and Stability
Make sure the fixture is securely mounted to the electrical box in the ceiling or wall, and that the box itself is properly rated for supporting the weight of the fixture.
Electrical Box Compatibility
Ensure the existing electrical box can support the weight and type of the new fixture. If you’re replacing a heavy fixture with a lighter one, or vice-versa, you may need to replace the electrical box.
Securing the Fixture Properly
Follow the manufacturer’s instructions for attaching the fixture to the mounting bracket and electrical box. A wobbly light fixture is not only unsightly but also a potential safety hazard.
Placement for Optimal Lighting
As discussed earlier, the placement of vanity and ceiling lights is crucial for functionality.
Vanity Light Height and Spacing
For sconces beside the mirror, aim for the center of the light to be at eye level, typically around 60-66 inches from the floor. For bar lights above the mirror, position them so they illuminate your face without causing direct glare when you look up.
Ceiling Light Distribution
Ensure ceiling lights are spaced to provide even illumination throughout the room, avoiding dark corners.
Maintaining Your Polished Chrome Fixtures
Polished chrome, while durable and relatively easy to clean, does require some basic care to keep it looking its best. Regular maintenance prevents minor issues from becoming bigger problems.
Daily/Weekly Cleaning Routine
The best way to keep polished chrome looking good is through consistent, light cleaning.
Using Soft Cloths Only
Always use a soft microfiber cloth or a soft cotton cloth. Avoid abrasive scrubbers, steel wool, or paper towels, as these can scratch the polished surface.
Gentle Soap and Water
For everyday cleaning, a damp cloth with a tiny bit of mild dish soap is usually sufficient for removing fingerprints or minor water spots. Rinse thoroughly with a clean, damp cloth and then dry immediately.
Immediate Drying is Key
This is probably the most important tip. After cleaning, or after any splashes, always dry the polished chrome thoroughly. This prevents water spots from forming, which can be stubborn to remove later.
Dealing with Water Spots and Mineral Deposits
If you have hard water or let water spots sit for too long, you might encounter these tougher spots.
Mild Solutions for Stubborn Spots
For more persistent water spots or faint mineral deposits, you can try a diluted solution of white vinegar and water (about a 1:1 ratio). Apply with a soft cloth, let it sit for a minute or two (but don’t let it dry), and then rinse and dry thoroughly.
Avoid Harsh Chemicals
Never use abrasive cleaners, bleach, ammonia-based products, or oven cleaners. These can damage the chrome plating and cause permanent discoloration or pitting.
Preventing Scratches
Scratches are the nemesis of polished finishes. Prevention is much easier than repair.
Be Mindful of Jewelry and Tools
When you’re working near your fixtures (e.g., changing a bulb or cleaning), be aware of rings, watches, or any tools you might be using that could accidentally scratch the chrome.
Careful Cleaning Techniques
As mentioned, always use soft cloths and gentle motions. Don’t press too hard when cleaning.
When to Call a Professional
For most routine cleaning and maintenance, you can handle it yourself. However, if you notice significant corrosion, pitting, or deep scratches that you can’t remove, it might be time to consult a professional or consider replacing the fixture.
By understanding the appeal, the different types, how to bulb them up, and how to care for them, you can confidently upgrade your bathroom with polished chrome contemporary light fixtures and enjoy a brighter, more stylish space.